Email Attachment
The New Attachment property box allows you to add an attachment to an e-mail sent with the Email activity.
To use the New Attachment dialog box
- Add the Email activity to your workflow definition by dragging it from the Toolbox Pane and dropping it in the Designer Pane.
- Select the activity in the Designer Pane.
- Under
 Email in the Properties Pane, select Attach.
 - In the New Attachment property box select the entry you want to attach.
- Click OK to attach the entry.

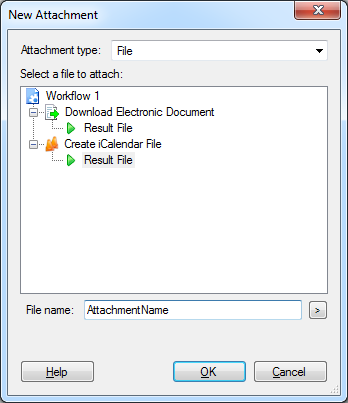
Next to Attachment type, choose between attaching a Laserfiche entry in the workflow or the resulting file from a Create iCalendar File activity or Download Electronic Document activity.
To attach the document that started the workflow, select Starting Entry.
To attach a document returned by another Workflow activity, expand the activity, and then select the document.
Example: To select a document returned by a Find Entry activity, expand Find Entry and then select Output Entry.
Specify whether the attachment is a document or a folder by selecting Document or Folder.
Note: If you specify that the attachment is a document, and it is really a folder, Workflow will apply the Folder Attachment Properties. Conversely, if you specify that the attachment is a folder, and it is really a document, Workflow will apply the Document Attachment Properties. In both cases, a warning will be filed in the Messages tab of the workflow's instance details, and the e-mail body will include a note saying that the attachment does not match the expected entry type.
Optional: Click Properties next to Document or Folder to open the Document Attachment Properties or the Folder Attachment Properties.
Expand the appropriate Create iCalendar File or Download Electronic Document activity and then select the Result File.
Specify a file name for the attachment.